Saturday, April 13, 2013

The Best Thing I Ever Ate....In Brooklyn

Krescendo Pizza Restaurant & Bar, Boerum Hill, Brooklyn.  Photo Credit: Dominic Perri (TimeOut.com)
 OK...so I have to admit, I wasn't a big fan of Brooklyn until last night.
I know, I know...I'm one of those New Yorkers who is guilty of the biggest sin
(sometimes) never leaving the island of Manhattan.

When my longtime friend/amazing chef decided to surprise me with a very 
"out-of-the-way" location for our dinner together, I wasn't instantly excited.
I knew he was up to something; 
He is the one person I have always enjoyed good food with on the highest level.
    
But he wanted to go all the way out to Brooklyn for pizza?  
"Was he crazy?!" I thought to myself.
I wondered what pizza could be 'that' good that it would be worth getting on the A Train to journey into the middle of nowhere?  And I was in heels for Christ's sake.

But then on an A Train and 20 minutes later (heels still on), 
is where we discovered the holy grail of all Pizza.

Krescendo Brooklyn.  Photo Credit: Elizabeth Lippman (NY Times)


Krescendo on Atlantic Avenue; Boerum Hill, Brooklyn
 
Photo Credit: Krescendo Brooklyn.

When we first arrived at this little neighborhood restaurant on a quaint block of Atlantic Avenue filled with upscale antique shops and boutiques
I instantly thought - typical nice pizza joint/bar.

The decor was nice, warm and inviting.  There was a beautiful wood-burning pizza oven in the back of the restaurant that was the center focal-point.

Photo Credit: Krescendo Brooklyn.


As we were seated only a few patrons were dining beside us,
 so I was still asking myself why we had come all this way.  

Until I tried my very first bite our one of our incredible appetizers.

Polpette al Forno: heavenly tender meatballs plated with a delicious tomato sauce in it's purest form.  The tomato sauce really made this dish for me. It was by far the best sauce I've EVER tasted and I'm a tomato sauce lover - I couldn't have done any better myself 
(I hate to say it but this was better than what I had when I was in Italy).  
It was fresh and simple to perfection.   
 
 
Photo Credit: SeriousEats.com

 Our 2nd Appetizer - a house special of the day (sadly to announce no photo!!)
 
Sweet-pea Agnolotti with Braised Short Rib Ragout: This dish took my breath away.  The fresh agnolotti was made with sweet-peas and the pasta just melted in my mouth.  But the best part of all was the mint ricotta.  MINT?!  Just genius.  How had I never discovered this before.  I will never look at ricotta the same way ever again.  
It was insanely good.
All the other ingredients in this dish just merried perfectly together: 
braised short ribs, onions, herbs...
such a hearty beautiful dish of comfort I wish Krescendo would add to their menu permanently!
To say that I was madly in love with this dish would be an understatement.


Pizza #1 - The Cure: This was an excellent choice.  The portion was perfect to share, the crust ridiculous charred to perfection in that incredible wood-burning oven.
Pomodoro and Mozzarella topped with hearty salame, pecorino cheese, and Calabrese chilies.  My favorite part of this pizza was definitely the Calabrese chilies.  They are savory and spicy with the perfect amount of chili heat, thinly slice and rare in the US (usually come directly imported from Italy)!  I've never tasted anything quite like it. 
This pizza is a winner and a must-try!    

"The Cure" Pizza, Krescendo Brooklyn.  Pomodoro, Mozzarella, Salame, Pecorino & Chilies.  Photo Credit: SeriousEats.com
Pizza #2- Finocchio Flower Power: The Championship winner and rightfully so.
I was told this pizza was praised with a championship award in Naples, Italy for the Caputo World Pizza competition.  And at Krescendo, the gold cup trophy was proudly displayed on the bar of their pizza kitchen.


"Finocchio Flower Power" Pizza, Naples World Pizza Championship winner - Krescendo, Brooklyn NY.  Photo Credit: SeriousEats.com
The Finocchio is deliciously creamy pecorino and shaved provolone cheeses topped with braised fennel, fennel sausage and fennel fronds.  Again you got the hint of the calabrese chili and the pizza is topped with a delicious olive oil.
Needless to say, this was absolute heaven on a crust! 

Finocchio Flower Power, Krescendo Brooklyn.  Pecorino, Provolone, Braised Fennel, Fennel Sausage. Photo Credit: SeriousEats.com
And by this time into our dinner...we were surrounded by a packed restaurant with not a single table available.  Interesting.  I'm guessing this place wasn't that typical pizza joint I had originally thought it may be.

But the biggest suprise of the night besides the unexpected food
 was by far personally meeting the famously renowned chef 
and Food Network's The Next Iron Chef contestant - Elizabeth Falkner.
She is the brains (and hands) behind all of the amazing food we ate at Krescendo. 
Incredible what a pastry chef can do with Pizza in New York.

Photo Credit: Krescendo Brooklyn.

Definitely worth a trip back on the A Train (or possibly an entire move of residence) JUST to visit this incredible Italian spot & Chef Falkner once again.
Truth be told, I will never look at Brooklyn the same way ever again.

Enjoy!
xoxo,
Jen 


Friday, March 29, 2013

Greek Goddess: Baked Eggplant Stacks

My very own Greek Eggplant with Yogurt and Tomato Basil Sauce

Nothing in the world represents Greece to me more than eggplant.

I was 21, studying away from home and backpacking my way through Europe.
When I hopped a flight from Paris to Greece with an Ancient Greek Mythology class
I truly had no idea what I was about to experience.
During my trip, I explored some of the most beautiful and culturally rich parts of ancient Greece:  from Athens, Delphi and the southern tip, Cape Sounion.  
Me on the Aegean Sea, Cape Sounion: 2003
Temple of Poseidon, Cape Sounion: 2003
Dinner in Athens: Fine Greek Dining At It's Best!
 It was during my visit to Athens that I experienced real traditional Mediterranean Greek cuisine.  Shared plates of moussaka, tzatziki, peppers, dolma (grape leaves) and feta were created to absolute perfection everywhere I went.   The pita was devoured at every meal.   Some of the best dive spots I visited were dined alfresco in places that made you feel as though you were sitting in someone's intimate (and quite rustic!) backyard in their countryside home.  The picnic tables were lined in red & white check, lit by candlelight if you were lucky enough.  At times there were no menus.  Nothing glamorous.
Just good, made to order fare, and just the way the local Greeks would have it.


All of the Greek ingredients were so fresh and full of pure Mediterranean flavors.
The spanakopita (phyllo pastry filled with spinach and feta) 
was unlike anything I had ever tried.
But one thing stood out to me most on my palette and that was the aubergine (eggplant).

It was served in it's purest form, not breaded, nor fried.
It was simply grilled to perfection or broiled in good Greek olive oil- allowing it's natural, distinguished taste to be fully enjoyed.

I remember the moment I took my very first bite of a heavenly dish of eggplant, 
tomato sauce and greek yogurt, I was hooked.
The combination was just unexpected and divine.
And I asked myself why I hadn't thought of this one sooner!

Meanwhile, in my own kitchen:


This time around I decided to bread & bake the eggplant rather than broil it pure in the oven.
I was craving the crispness of a "lightly-fried" texture without all the added calories.

I prepared the 1/2" wide slices of eggplant by sprinkling them with sea salt on a paper towl and leaving them to sit for 20 minutes until much of the retained water was released from the eggplant.  **This step is oh-so important! Eggplant contains so much moisture that can ruin any dish!**

I blotted the eggplants with paper towels afterward and then dipped them in order of seasoned flour; egg (beaten) ; panko breadcrumbs. 
I used individual zip lock bags for these 3 steps - saves the clean up!

After arranging the breaded eggplant slices on an olive oil coated baking sheet,


In a preheated oven at 425 degrees, I baked them for 30 minutes 


(flipping once half way through until each side is golden brown and crispy).


And while the eggplant is baking in the oven, I cook the tomato basil sauce.
It's very similar to all of my other traditional marinara sauce recipes except this one involves only a very few simple ingredients:


 I always love a good canned Cento whole peeled tomatoes and a little Sclafani Tomato Paste puree (this helps to thicken the sauce and give it richness).  I combine with sauteed chopped garlic and some freshly chopped basil along with a tablespoon (or two!) of unsalted butter (a little goes a long way).
  
I simmer the sauce for about 30 minutes until the consistency is slightly thickened and wholesome.  Add a little red wine for an exceptional kick!


Once the eggplant is baked and the sauce in complete, layer the eggplant slices + with a spoonful of greek yogurt and a little tomato sauce in between each slice.

Top with basil and drizzle with a little good olive oil.
Greek heaven on a plate!

My Baked Eggplant Stacks with Greek yogurt and tomato basil.
HEAVEN
IN EVERY BITE


-------------------- 

Greek Eggplant Stacks with Yogurt & Tomato Basil Sauce


Recipe serves 4.   Prep/Cook time: 1 hour

Ingredients
2 medium - large eggplants
1 cup panko bread crumbs (or stale bread can be used to make your own breadcrumbs in a food processor!)
3 eggs, beaten
1/2 cup all purpose flour
1 cup Greek Yogurt (I prefer FAGE whole or 2% for this dish, but adjust if you prefer) 
2 tablespoon extra-virgin olive oil
2 tbsps butter
2 cloves garlic, minced
1/4 cup red wine (optional - for tomato sauce)
1 can (28 - 35 ounces) whole plum tomatoes, drained & crushed by hand (I prefer Cento or San Marzano)
2 tablespoons Tomato Paste puree (I used Sclafani)
8 leaves of fresh Basil, roughly chopped
Freshly ground salt & pepper

   
Preparation & Cooking instructions:  
 FOR THE EGGPLANT:
 1. Preheat the oven to 425 degrees.
2. Rinse and Clean the eggplant.  Slice the eggplants into 1/2" wide slices crosswise (discarding any smaller slices of the eggplant, keeping slices that are similar in size).
2.  Lay the eggplant slices on paper towels and sprinkle each side of the slices with sea salt.  Let sit for 20 minutes.  Then blot the eggplants with paper towels to absorb the excess moisture.
3.  In 3 plastic zip lock bags (each bag with 1 dipping ingredient), coat the eggplant slices in batches in the flour (seasoned with salt & pepper), then the egg, and then the break crumbs.  Shake off any excess ingredients in between each coating.
 4. On an olive oil coated baking sheet, lay the eggplant slices in a single layer (you may need more than 1 baking sheet).  Place in  a 425 degree oven for 30 minutes.  Flip the eggplants half way through until both sides are golden brown and crispy.
5. Set aside and keep warm until serving. 
FOR THE SAUCE:
1. In a large skillet or heavy bottomed pan, heat 1 tbsp olive oil & 1 tbsp butter on medium high heat.
2. Add in the chopped garlic, salt & pepper to taste, saute until soft and lightly brown, stirring often.
3. Lower the heat to medium.  Add in hand-crushed plum tomatoes, simmer for 5 minutes. Add in the tomato paste, stir to combine and until dissolved. Add in 4 leaves of basil, chopped.
5. Simmer the sauce uncovered for 30 minutes, stirring occassionally and adding more salt & pepper to taste.  Add in 1 extra tablespoon of the unsalted butter in the last 5 minutes of simmering.  Add in red wine if desired.
6.  Once the Tomato Sauce is cooked, turn off  the heat, allowing the sauce to thicken and cool for 10 minutes.
ASSEMBLING THE STACKS:
1. Layer as follows: Eggplant slice, spoonful of greek yogurt, spoonful of tomato sauce, eggplant slice....and so on
2. I typically use about 3 - 4 eggplant slices per serving/stack.
3. Top with basil and drizzle with good olive oil.
4. Serve warm.
ENJOY!!
XOXO 
Jen   
Sunday, March 17, 2013

Sushi Love

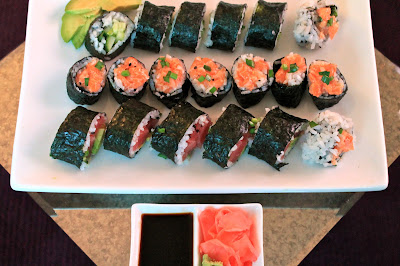
My very own handmade sushi hand roll trio: Toro Avocado Roll; Spicy Salmon Roll; Cucumber roll


Tonight was a dinner date all with myself and a very impressive one needless to say.
And since I had only myself to impress, 
I figured now would be the time I'd try something entirely new.
Whether the outcome good or bad, I knew I had nothing to lose! 

My very first attempt at making hand made sushi was surprisingly a successful one.
I was no Iron Chef of America.
I had always feared the sushi mat.  
My expertise on finding the best sashimi was still questionable.
How would I make the rice stick to the nori?
Would it even be edible?
All of the answers to my questions where right at my finger tips, literally!

  
After doing some research, I had discovered that an Asian grocer that I had so frequently ignored over the years was busy carrying some of the most delicious sashimi selections, 
and all in perfect portions.

Commonly my go-to spots for sushi-grade quality seafood would be 
Dean & DeLuca, Citarella, Wild Edibles...etc.  
They were always reliable, but left a horrible dent in my wallet.

And then there was M2M.
It is a wonderful Asian grocery store that has just about everything you would need to create the perfect at-home Japanese sushi experience ...
and at a much more affordable price!     


At M2M, a 1/4lb-1/3lb cut of sashimi will cost just as much
 as a hand roll typically would in a restaurant, 
but will make up to 3 rolls of sushi at home depending on how you use it.

This sashimi tasted so good and sliced like butter.
was entirely impressed with the overall quality! 

**If you can't get fresh sashimi from a grocer or fishmonger, then I would suggest purchasing your favorite sashimi from your local Japanese restaurant to use for your own hand made sushi!
    

The sushi rolling mat I used to prepare my hand rolls was actually made out of silicone and so much better than those old fashioned bamboo mats.
And so much more hygienic too! 

The brand of the mat I used is by Lekue 
and can be found at Sur La Table stores in NYC or online.

This excellent video demonstrates just how easy all of this was!


The best part about tonight's dinner was that I already had ALL of the simple ingredients fully stocked in my pantry and fridge except for the sashimi 
(I always love when that happens).


I prepare thinly sliced cucumbers (lenghwise) to the size of a hand roll.
I also finely chop fresh chives and set aside an avocado for thin slicing as well as sesame seeds.  I lightly rinse and pat dry the sashimi cuts.  Make sure to keep the fish chilled on ice until just before using.


For the Spicy Salmon roll - I combine in a small bowl the finely minced (tartar style) salmon with a dash of "spicy mayo" and a sprinkle of chives.
The key ingredients to the spicy mayo are SO simple:  
1/2 cup mayonnaise + 1 tbsp. Sriracha hot sauce.


On my sushi mat, I place a Nori (unseasoned dried seaweed sheet) with the glossier, shiny side down on the mat along with an evenly thin layer of the sushi rice spread out all over the mat (but leaving a 1" spacing at the opposite end of the Nori sheet).


 At the end closest to me on the Nori/Rice sheet, spoon a thin layer of the Spicy Salmon mixture over the top of the rice in a 1" wide strip.


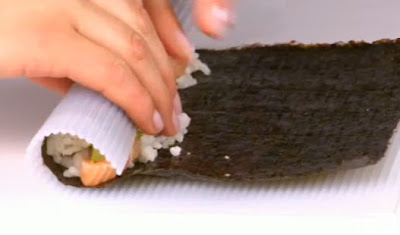
Below is an excellent, fool-proof diagram from Japanese chef Marc Matsumoto on the PBS 'Fresh Tastes' Food Blog:

It is THAT easy! 

and voila! Hand made Spicy Salmon Chive Hand Roll!
The texture will melt in your mouth, the taste is unforgettable!
  

I always like a simple, pure and healthy cucumber roll to balance out the meal.

Next up is a Toro (fatty Tuna) Avocado Roll.
This is healthy and delicious. 

I begin with a thinly sliced (halved) avocado and thinly sliced (lengthwise) strips of the Toro sashimi.


On a Nori sheet with rice on top, placed on the sushi mat,
 I overlap slices of avocado along a 1" border.
 

Then overlap the Toro slices on top of the avocado.  
Sprinkle with chives and sesame seeds if desired.


Roll up your sushi mat, making sure to roll it tight so the ingredients don't separate from the nori & sushi rice.  

Using a very sharp knife (sushi knife would be ideal), score the roll at the midpoint, then score the middle of each half, and then score the middle of each quarter (you should have 8 segments).

My very own heavenly sushi platter
 

Toro (fatty tuna) avocado roll
Spicy Salmon Chive Roll + Cucumber Roll

 Enjoy!! 
xoxo
Iron Chef Jen


----------------
Hand Made Sushi Hand Rolls
*Spicy Salmon Chive Roll
*Toro Avocado Roll
*Cucumber Roll  
Recipe below serves 2.  Duplicate the measuring for larger servings.


Ingredients


For Sushi Roll filling:
1/4 lb. fresh sashimi-grade Toro (fatty tuna), thinly sliced lengthwise
1/4 lbs. fresh sashimi-grade Salmon, finely minced until tartar style paste
1/2 avocado (pitted), thinly sliced
1 teaspoon sesame seeds
chives, finely minced 
For Rice:
12 ounces short grain sushi rice
1 1/2 cups cold water
4 tablespoons rice vinegar
3 tablespoons granulated sugar
1 teaspoon salt 
2 teaspoons sesame seeds
For Spicy Mayo
1/2 cup mayonnaise
1 tablespoon Sriracha hot sauce (adjust as needed)
Tools/For Roll:
1 pack unseasoned nori for sushi (1 sheet per roll)
1 silicone or bamboo makisu (bamboo mat for rolling sushi)     
Preparation / Cooking Instructions

1. Prepare the sushi rice.  Wash the rice in a sieve until the water is almost clear.  Drain and add to a heavy bottomed pot along with the water.  Bring the pot to a boil and cover with a lid.  Turn down the heat to a low simmer, leaving to simmer for 15 minutes (stirring occasionally so the rice doesn't completely stick to the pot).
2. After 15 min., remove the rice pot from heat and let the rice steam for an additional 10 minutes. 
Do not open the lid during this time.
3. In a small bowl, whisk the vinegar, sugar and salt together.  In a separate dish, place the rice from the pot to the dish and carefully fold in the sushi vinegar mixture, using a spatula to fold and combine.
Leave the rice out to cool until at room temperature.
4.  For the Spicy Salmon Roll: in a bowl, combine the minced salmon with 2 tablespoons of the spice mayo mixture and a sprinkle of chives and sesame seeds.
5.  Lay the nori, shiny side down on the sushi mat.
6.  Wet your fingertips with water and lay down a thin layer of rice, leaving a 1" spacing empty from the top of the nori.  The rice will be sticky - dip your fingers in water to help release some of the stickness when pressing the rice outwards to keep an even thin surface layer.
7. Spoon the Spicy Salmon mixture across the bottom edge of the nori/rice sheet (at the edge closest to you) - from 1 end to the opposite end creating a 1" border.  Try NOT to overfill at this point.  The thicker your filling, the bigger the roll will turn out and the messier the presentation might be.
8.  Hook your thumbs below the sushi mat and roll the edge of the mat up and over the filling.  Do not squeeze the roll too much at this point or the sushi won't stay in place.
9.  Continue rolling, being careful not to roll the mat along with the sushi.  When you've reached the end, give the roll a good squeeze from all around to set in the shape of the rice. 
You should end up with a slightly square long roll.
10.  Using a very sharp knife (sushi knife would be ideal), score the roll at the midpoint, then score the middle of each half, and then score the middle of each quarter (you should have 8 segments).
11.  For the Toro Avocado Roll: repeat all of the above steps except for the sushi filling mixture.
Use thinly sliced avocados with thinly sliced Toro placed on top as the filling.
 Enjoy!!
xoxo
Jen