Thursday, March 7, 2013

Sushi Ceviche: Fusion style!

My very own Sushi Ceviche: featuring Sashimi-Grade Ahi Tuna in a Citrus Ceviche with a Japanese twist


Spring hasn't even begun yet, and I'm already dreaming of summer night dinners alfresco on the terrace.
I miss my dinner parties with good friends; the delicious, pure, light hearted fare, and most of all...the simplicity of a Ceviche.

When it's too hot out to cook... or when my day at work turns into a full-night affair..
the one thing I look forward to most is staying in the comfort of my own home and "throwing together" the most simple ingredients to create a heavenly dish.  

I've obsessed over ceviches before.

My own summer ceviche love affair

But this time around, it's my new found obsession with making Sushi.
And somehow I've managed to combine Sushi with Peruvian ceviche, ha!
Now we're talkin'!
  
Even though I'm just learning the very basics about Japanese sashimi
I'm starting to discover one key thing...it's all in the fish.  


 I've searched the markets high and low for the best of the best.
A good chef friend led me to the holy grail.
In NYC, my #1 specialty market: Dean & DeLuca.  And option #2: Citarella.
**open to even better suggestions if one has! Please help!

Though quite pricey I won't lie!...you are truly getting "the very best".
Once selected from the butcher, make sure to ask for them to pack it in ice - 
to keep it the freshest!

Pictured above: heavenly SASHIMI-GRADE Yellow Fin (Ahi) Tuna  
I sliced approx. 4 ounce (1/4lb.) single portion for the recipe below.
An entire 1 lb. Sashimi-Grade Ahi Tuna steak will run you about $22/lb. 
 
For this recipe, you will need a metal ring, square or rectangular mold.
The presentation is fantastic!

For the full recipe: see full details at the bottom of this post!

Begin by layering thinly sliced English cucumbers on a plate, overlapping each slice in a shape slightly greater than the size of your mold. 


 In a small stainless steel bowl, combine the sushi-grade Tuna (sliced into cubes), thinly sliced red onions, lime juice, freshly squeezed grapefruit juice and a touch of olive oil, sea salt & black pepper.


Chill the Tuna mixture for 5 min. - 45 min. (max!) 
depending on how you prefer the consistency of your ceviche.  
The fish will actually "cook" in the acidic marinade during this time.
The longer it marinates, the tougher and more cooked the fish will get so timing is key.
   
Personally I prefer mine tender and almost raw...or just like I would enjoy sushi, so usually I just "toss" it in the marinade for literally a few minutes right before serving!


 While chilling & "marinating" the ceviche in the citrus juices,
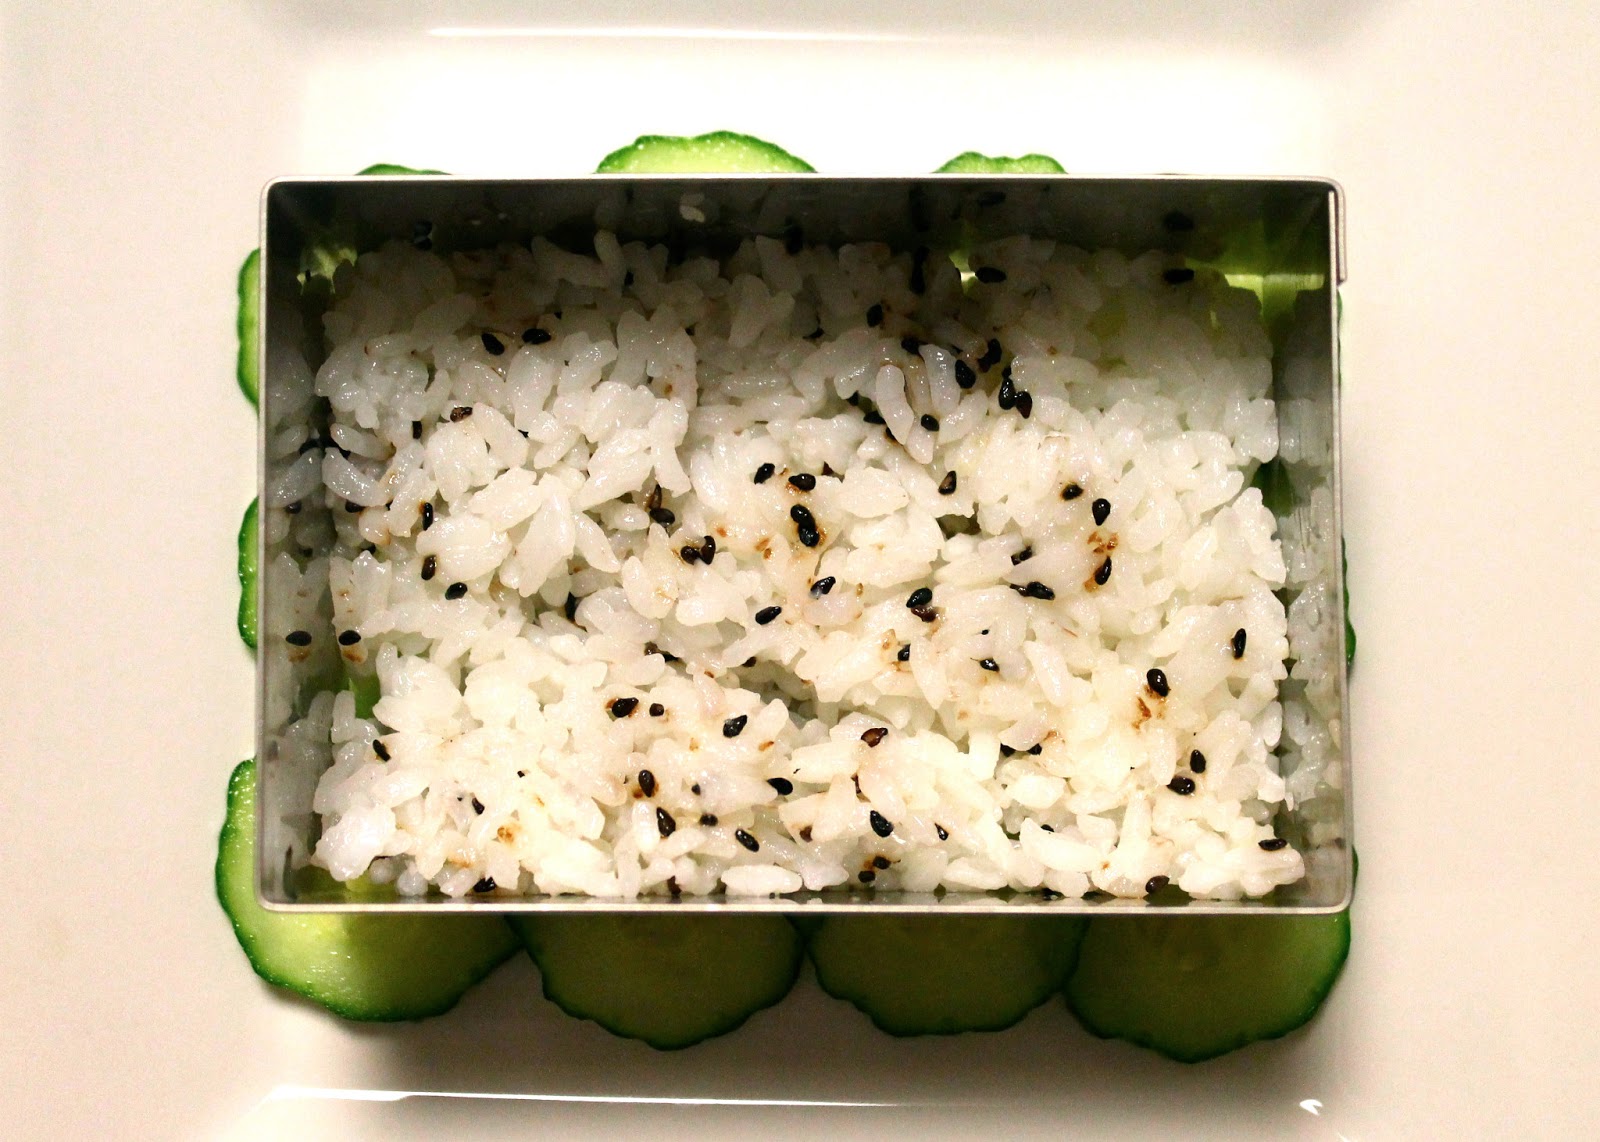
prepare the Sushi Rice with the "Sushi Vinegar" and sesame seeds.
Center the metal mold over the top of the cucumber slices and spoon in a layer of sushi rice.
   

 Place thinly sliced avocado halves in a layer on top of the rice.


On top of the avocado, add a layer of chopped grapefruit segments (all skins fully removed from the segments of a Star Ruby or regular grapefruit) CLICK HERE FOR TUTORIAL.
This is a great video to watch...
 and learning this trick on how to prepare what used to be my most hated fruit,
 has now gotten me to eat a grapefruit a day!


And then add a finishing layer of the chilled & marinated Tuna ceviche on top. 

Trim around the mold by slicing away any excess cucumbers extending past the mold (or keep them as is if you prefer..it's all up to you!) 


 To top it all off, sprinkle cilantro and thinly sliced Nori over the top of the "Sushi Ceviche" Tartar.  Drizzle with soy sauce or sweet balsamic reduction if you prefer.
**I always keep my pantry stocked with a good bottle of balsamic reduction --
 always adds an incredible finishing touch!

Carefully and slowly lift off the metal ring mold to reveal the most beautiful and delicious presentation. 
My 6 layer Sushi Sashimi Ceviche with Citrus Grapefruit and Balsamic Reduction


**Food for thought: this recipe can also be arranged with sashimi-grade salmon as well.
My own recipe was adapted from Cristina's blog, Buenos Aires to Paris and her incredibly inspiring take on Sushi Ceviche fusion.. 


 ----------------------------
full recipe below: 


----------------
Ahi Tuna Sushi Ceviche with Citrus & Balsamic sauce
Recipe below serves 1.  Duplicate the measuring for larger servings.
Ingredients
1/4 lb. (4 ounce) SASHIMI-GRADE Yellow Fin (Ahi) Tuna, cubed into bite size pieces
1 lime (for fish "cooking" marinade)
1/2 grapefruit, peeled and segmented (all skins removed) **click on the "segmented" link for a very clever video!
2 tablespoons extra virgin olive oil
1/4 teaspoon sea salt or *maldon salt (*my favorite, must try!)
1/4 teaspoon pepper
1/2 large or 1 small avocado, pitted and thinly sliced
1/2 cup Japanese sushi "sticky" rice
1 cup water
2 tablespoons Rice Wine vinegar
1 tablespoon sugar
1/2 tablespoon sesame seeds
1/8 cup very thinly sliced red onion
Approx 15-20 thinly sliced English Cucumber
1 tablespoon fresh chopped cilantro (optional)
Nori seaweed, sliced into thin strands (optional, for garnish)
Balsamic Reduction (optional, for drizzling) 

Tools:
1 metal mold for forming the tartar: round, square or rectangular


Preparation & Cooking instructions:
 
1. Dice the fish  (approx. 1/2" to 3/4" dice).  Place in a small stainless steel bowl.
2.  Marinate the fish in the lime juice, sliced red onions, 4 tablespoons grapefruit juice, olive oil, salt and pepper - chill in the fridge for 5 min - 45 min. depending on desired consistency (10 min. for most tender and just barely cooked). Stir occasionally.
3.  Prepare the sushi rice. Rince the rice under cold water until the water runs clear.  
Place in a medium saucepan with 1 cup water, bring to a boil, cover with lid and turn heat down to medium/low.  Simmer for 10-15 min.  Remove from heat.  Combine the Sushi Vinegar: 2 tbsp. Rice Vinegar + 1 tbsp sugar + a pinch of salt.    Place the cooked rice in a dish.  Combine with the Sushi Vinegar and sesame seeds.  Fold gently until combined and cover with plastic wrap - leaving out at room temperature.
4. Drain the fish marinade.  
5.  Form the tartar layers as follows (see photos above): layer the cucumbers in a shape greater than the size/shape of the mold - overlapping the sliced cucumbers slightly.  
In the mold placed on top of the cucumber slices: add a layer of sushi rice, then the sliced avocados, 2 segments of grapefruit (sliced), the Tuna ceviche mixture, and top with garnishes if preferred (cilantro, nori, etc).
6.  Drizzle the plate and the tartar with balsamic reduction or soy sauce.
7.  Slowly remove the metal ring mold, serve immediately & chilled.

Enjoy!!
xoxo
Jen


Monday, February 18, 2013

A Food Hall & A Frenchman

The Todd English Food Hall at The Plaza Hotel, NYC.  The perfect date.

 On Saturday evening, I received the royal treatment.
I was in the company of a wonderfully handsome man with a fabulous French accent 
(a little bit of Paris in New York is always a good thing).
And I was lucky enough to be spoiled with some of the most marvelous dishes I've ever tasted in the fanciest food court of all time, at The Plaza.


I've never been to a Todd English restaurant before but it's always been high on my list.
However I now can say I am hooked on his cuisine for life.  My advice?  Run...don't walk!

Upon entering the Food Hall which has it's very own stately entrance 
at The Plaza via Central Park South,
I was stunned by the wide open space and the art deco brasserie style decor.
And I just loved the open kitchen atmosphere.
All I can say is thank goodness we had a reservation.

The serious raw bar and artisanal cheese selection immediately caught my attention.  


 As did the pasta station.  Every variety of handmade pasta was beautifully displayed.
I was in pasta heaven.  
 
The extraordinary pasta station.
 And then there were the endless selections of charcuterie, cheeses, raw bar and appetizers.
 With so many, how can one choose?
The selection covered everything from my favorite Boucheron goat cheese to melt-in-your mouth Prosciutto, handmade dumplings (oh yes!) and even those incredible tiered straight-from-the-raw-bar seafood  platters that remind me of my days in Paris.
I can already see I will be spending lots of time here. 


Our first course we shared was a salad from the special's menu:
watercress & endive with artisanal cheese and (very) candied walnuts.
So simple and delicious with a sweet twist.

But what came next for the second course I was unprepared for.
Prime Rib Sliders in a Fontina cheese fondu.
The prime rib was so tender and flavorful: it was by far one of the best I've  ever had.
The fontina "fondu" was an extraordinary taste.
A beautiful blend of cheeses and complimented the slider perfectly.
The first bite was heaven on a bun.  I totally pigged out on this one.
 The Frenchman has very good taste!

Prime Rib Sliders with minced red onion and fontina fondu

I knew from the start that our 3rd course must be one of those incredible signature pasta's on display.
So I ordered us the handmade Pappardelle Pomodoro.


The dish was accompanied by toasted garlic in the traditional tomato basil sauce but the surprise inside was the herb whipped ricotta hidden between ribbons of pappardelle.
We both melted over this dish.


All in all, I cannot wait to go back to this place.  Not only was it excellent food but gave a whole new meaning to falling in love at first bite.

 xoxo,
Jen


**All photo credits go to Todd English Food Hall foodies extraordinare.


Sunday, February 10, 2013

Heavenly Guilt-Free "Mac & Cheese" with Bacon & Peas

My almost guilt-free "Mac & Cheese" with Bacon & Peas
  I'm not kidding when I say I live for Mac & Cheese.  
I am the maestro of the macaroni.
The connoisseur de la cheese.
Mac & Cheese is one of life's most comforting & simple but guilty pleasures.
Had I ever imagined an *almost* carb-free version that tasted just as delicious and is still oozing with molten cheese and crunchy with buttery golden-brown deliciousness?
Never.  
Hello!...This is heaven on a plate here people!!
 
 The secret key ingredient (although a secret no more) is the spaghetti squash.
Yeah, so I'll admit, I had no idea what a spaghetti squash even looked like prior.
Or that there was even a difference between a "spaghetti" and a "butternut" squash.
Or that somehow a squash could become a pretty awesome substitute for macaroni.
Who knew?!  I promise I am not leading you on here.
   
And when I did my research, I was shocked and happy to find out that my local grocer had them in stock daily.  YES! 
Spaghetti Squash is distinguished on the outside by it's shape and color (see below). 
 
Photo courtesy of ©2013 Steamy Kitchen, Inc.
 A spaghetti squash is round and oblong in shape, like a watermelon.
It has a bright yellow coloring.
It's also very affordable at around $1.50/lb from my gourmet grocer!   

The recipe I'm sharing with you is a low-carb take on my November 2012 post  "Pasta, Peas, Panchetta & Parm" but for all you Mac & Cheese lovers out there.

The first step to this dish (preparing the squash) is to slice away the stemmed top and slice the squash in half lengthwise.  It can be difficult to slice so you will need a large extra-sharp knife.  
If you are as clumsy in the kitchen as I am, please be extra careful!

Place the squash halves cut-side down in a baking dish.
 Fill the dish with water to 1/2" high around the squash.   
Cover the top of the dish with aluminum foil.

Place in a pre-heated 375 degree oven for 45 minutes until tender.
Remove from the oven, turn the squash over so the cut sides are facing up, seal with foil and place back in the oven for an additional 15 minutes until the squash is very tender.

Photo courtesy of ©2013 Steamy Kitchen, Inc.
Let the squash halves cool slightly for 10 minutes.  
Remove all of the seeds in the center.

Now is the fun part!  
Scrape out the flesh of the squash with a fork and watch it "spaghetti" into thin strands!
One 2-1/4 lb. squash will feed A LOT of people.

Photo courtesy of ©2013 Steamy Kitchen, Inc.

Lower the oven temperature to 350 degrees.
In the meantime (to create the sauce): in a skillet, heat on medium high 1 tablespoon butter + 1 tablespoon olive oil the chopped bacon and once golden brown, 
add in the chopped garlic, saute for 2 minutes.
Lower heat to medium low and add in 2 tablespoons of flour, stir to combine.
Add 1/4 cup of milk (I used skim for less guilt!), stir and simmer until starting to thicken.
Gradually add in 2 additional tablespoons of butter, salt & pepper and the shredded cheese, stirring constantly until melted.  Add in more milk as needed to create a good consistency in the sauce (not too thick is ideal).
Stir in the spaghetti squash and peas to the sauce, mix well to evenly combine all ingredients.   Place the mixture into a medium size gratin or casserole dish, sprinkle with shredded parmesan and place uncovered in 350 degree oven for 20 minutes or until bubbling and golden brown.  Let cool slightly, serve warm and enjoy!!

This dish has only about 250 calories a serving with 9 grams fat, 20 grams carbs & 17 grams protein.
 
Aside from this tasty recipe, there are so many dishes incorporating the use of spaghetti squash that I am dying to try.  Many of them diet friendly, gluten-free and even vegan friendly!

Spaghetti Squash with Marinara
 

Baked Spaghetti Squash boats with Butter & Herbes


Spaghetti Squash with Broccoli & Parmesan
Spaghetti Squash with Sausage
Spaghetti Squash Shrimp, Lemon & White Wine Butter
Zucchini & Spaghetti Squash Lasagna


 And with my simple and easy Spaghetti Squash preparation above, there are endless "Mac & Cheese" options out there to play with!

Truffled accompanied by Parm, White Truffle Oil & Parsley (my all-time fav)

Gruyère with carmelized onions, bacon & arugula (très French)

Appenzeller Swiss with crème fraîche, nutmeg & shallots

Goat Cheddar with Basil, Garlic, Peccorino & Manchego

Midsummer's accompanied by Goat Cheese, Olives & Thyme

Chilean with Tomatillo, Roasted Green Chile, Garlic & Cilantro

New England Crab with Peas, Marscapone & Asiago

Vegetable with Ricotta, Zucchini & Walnuts

Autumn-Inspired with Pumpkin, Sage & Prosciutto

 Ahh...someone please make me stop! 

----------------
Heavenly Guilt-Free "Mac & Cheese" with Bacon & Peas
Recipe serves 4-6.   
Total preparation time: 2 hours ("Inactive" cooking time: 1 1/2 hrs)


Ingredients

1 (2 1/4 lb.) Spaghetti Squash, halved
4 slices of bacon, uncooked and chopped into bite size pieces
2 garlic cloves, chopped
2 tbsp all purpose flour
3 tbsp unsalted butter
1 tbsp extra virgin olive oil
salt & ground black pepper (to taste)
3/4 cup skim milk
3/4 cup shredded white cheddar cheese
3/4 cup shredded Parmesan cheese + extra for sprinkling
1 cup frozen peas, thawed


Preparation & Cooking instructions:
 
1Preheat oven to 375 degrees.
2. Prepare the squash by very carefully slicing away the stemmed top and slice the squash in half lengthwise.  
3.  Place the squash halves cut-side down in a baking dish.  Fill the dish with water to 1/2" high around the squash.  Cover the top of the baking pan with aluminum foil.
4. Place in a 375 degree oven for 45 minutes until tender. 
5. Then remove from the oven, turn the squash over so the cut sides are facing up, seal with foil and place back in the oven for additional 15 minutes until the squash are very tender.
6. Let the squash cool for 10 minutes. Remove all of the seeds in the center.    
7. Gently scrape out the flesh of the squash with a fork until the squash spaghettis into thin strands.
8.  Lower the oven temp to 350 degrees.
9.  To prepare the sauce: in a skillet on medium high heat, add 1 tbsp. butter and 1 tbsp olive oil.
10.  Add in the chopped bacon and saute til golden brown (about 5 min).  Then add in the chopped garlic, salt & pepper, saute until golden (2 minutes).  
11.  Lower the heat to medium low and stir in the flour, combine.  Add in 1/4 cup of milk, stir and simmer until starting to thicken.  Gradually add in 2 additional tbsps of butter, salt & pepper to taste and the shredded cheeses, stirring constantly until fully melted and creamy.  Add in more milk as needed to get a desired consistency (not too thick is ideal).
12.  In the skillet, stir in the spaghetti squash and peas into the sauce.  Mix well to evenly combine.  Place the entire mixture into a medium size gratin or casserole dish.
Sprinkle with shredded Parmesan and place uncovered in a 350 degree oven for 20 minutes or until bubbling and golden brown.  
Let cool slightly, serve warm and enjoy!  
 
xoxo
Jennifer